Announcement

Collapse
No announcement yet.

Big Blowaway 10x20 ft - anyone have one of these? tips to make it last?

Collapse

X
 
  • Filter
  • Time
  • Show
Clear All
new posts

  • Big Blowaway 10x20 ft - anyone have one of these? tips to make it last?

    I bought myself a cheap polytunnel a little while ago, its a big blowaway 10x20 ft (3x6m) with a tent type frame. its got the usual cover made up of squares.

    i spent a lot of time looking around at everything availiable onine and went for this because it was big, but the frame/poles are a lot more sturdy than anything else i could find.

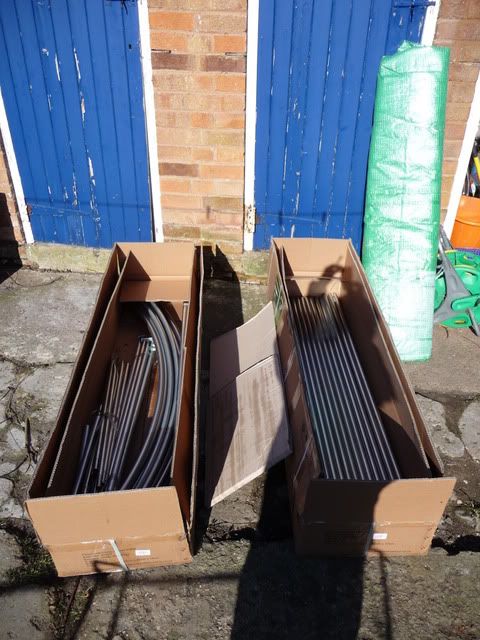
    its been sat in the shed still in the boxes, ive had a look at it and it looks quite good, poles are very chunky and strong compared to anything else ive seen. so at least i have a frame for netting if the cover doesnt stand up to much.

    i got it on ebay, its not a widely availiable model like all others. i paid £103 plus 23 postage as i won one on bids. i did watch them for a while before i bid, i saw the odd one go at 80-90... bargain
    buy it now is about £250, couldnt afford that and would have saved it towards a real tunnel. but.

    heres exactly what i bought.

    3x6m Titan Polytunnel, Polytunnels, Poly Tunnel, Greenhouse, Allotment, Cloche | eBay


    does anyone else have one of these, and have it up yet, be a couple of weeks before i can get mine up.

    any tips of what to do to secure the skirt of the cover down ?
    should i dig a trench and bury it, then add weight to the top? of just on the floor pinned down with heavy stuff.
    any tips on protecting the cover from and rough edges of whatever i use to weigh it down.?

    the instructions say you can also dig a trench and sink the ground bars as well as the skirt, but will the poles last long if buried?
    Last edited by woody21; 09-04-2012, 03:52 PM.

  • #2
    Build it inside a 21x11 stayput!

    Loving my allotment!

    Comment


    • #3
      I have a greenhouse still intact :erected 30 years ago.

      Before you bury anything metallic in soil, cover in car Waxoyl underseal: it is wax based and will prevent corrosion.
      http://www.amazon.co.uk/Hammerite-Un...4058592&sr=8-1


      To keep down teh sides you want a stable but easy to remove system of holding it down.. I would recommend surplus wooden planks - (pallets?) weighed down with a breeze block or stone in the middle.
      Digging a trench and burying is hard work and ensures you ruin it when trying to remove it.

      Whatever anchorage you have, dig holes and surround the anchorage with a mortar mix designed for retaining fence posts.. It sets fairly quickly - but means that the anchorages are really solidly placed. Then beat the ground around hard so it cannot move in a hurry.

      Comment


      • #4
        Taking all these tips in, for when we get a poly tunnel
        Ali

        My blog: feral007.com/countrylife/

        Some days it's hardly worth chewing through the restraints!

        One bit of old folklore wisdom says to plant tomatoes when the soil is warm enough to sit on with bare buttocks. In surburban areas, use the back of your wrist. Jackie French

        Member of the Eastern Branch of the Darn Under Nutter's Club

        Comment


        • #5
          I have a very similar one - from ebay 3m long by 2m high and 2m wide. Very easy to put up. I put my on up on a patio and bolted it to the flag stones with metal straps. Cover on and weighted down with bricks. If i were to put it on ground i would peg it deep several points at each side and weigh it down with brick too as they are very light.

          Comment


          • #6
            i had the same tunnel,ive sold it and got a 12 x8 greenhouse instead.too exposed here for green ebay tunnels lol.they pretty much go up like a standard tunnel just a little weaker frame wise unless u got the newer galvanised one,mine was white powder coated.)

            Comment


            • #7
              How are the poles/frame held together? Unless they're bolted/screwed together, put a squirt of silicone in all the joins, otherwise any wind-rock causes the frame to come apart, which is just as damaging as the whole thing blowing away. Also, don't fret too much about damaging the cover, from what I've seen, you won't get more than a year out of it before the plastic squares start to fall out, leaving the green mesh behind. However, if that happens but the frame is still useable, you can replace the cover with proper polytunnel plastic for about £100-ish.

              Comment


              • #8
                I had a smaller version to yours Woody21, but as Sarzwix says, it's the cover that won't last. Mine lasted for 2 years before it needed to be replaced. We've now recycled the frame as a fruit 'cage'. I loved it though!

                Comment


                • #9
                  Hi , i have one of these and had a smaller one before. It is toitally correct to point out that the cover will rot as the stitching is plain old cotton and gradually all rots away. also the zips dont last ten mins under any ammount of use. Also she did nearlt blow away once with me holding on inside but i have moved on since then and she is rock solid even in a storm.

                  I have to say I have become a bit expert in modifying and 'strengthening' as my paddock is super exposed. As the zips are so poor I have built a door at one end (cost <£10).

                  For 100 pounds I cannot complain as the poly has brought me loads of pleasure , a place to shelter ( find peace) and lots of lovely veg. It has totally convinced me to get a ' proper' poly when I can be bothered to lay out about 600 pounds for the one I want and build one of course

                  If you want to check my facebook i'll upload the pics of most of my upgrades. F/book
                  name is Mas Man ..............or this link may work.

                  Grow your own veg & some duck eggs too | Facebook

                  Best of luck

                  Mas
                  Last edited by ukmastiff; 13-04-2012, 03:39 PM.
                  '3000 volts says the ducks
                  are mine foxey !'

                  Comment


                  • #10
                    Thanks guys for all your information and comments, its very helpfull indeed to know what others have done or would do.

                    Mas - Your pictures really are fantastic and your improvements are top notch, well done.
                    i hope my zips will last a few weeks while i get round to doing the same as you have with the door.

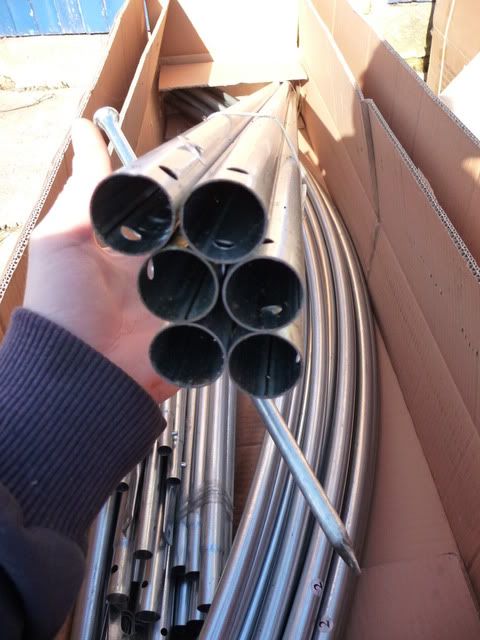
                    i have what would appear to be the newer model with the galvanised framework, i havent assembled it yet but have had a look in the box. the framework poles are of a good diameter and good wall thickness.
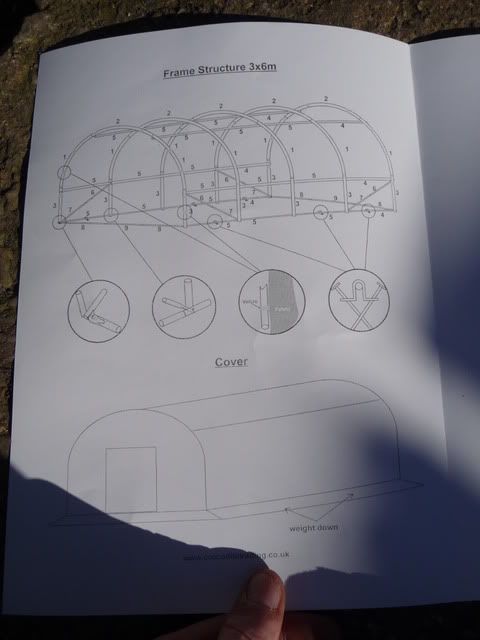
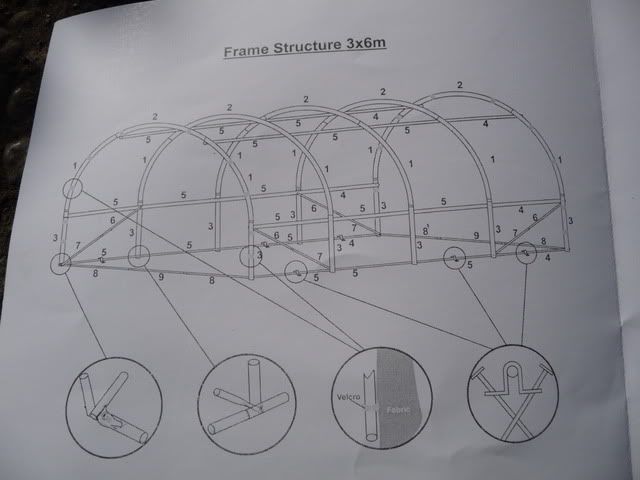
                    poles lock together with sprung pins just like a big tent, there are also bracing bars which bolt into place.
                    the poles are like what you would get with a good quality trailer tent or caravan awning.

                    replacement covers go for 30-40 on auction from the same seller i bought the tunnel from which seems great. but once mine goes i will upgrade. as im just beginning with the garden this year it was cheap one or nothing.

                    quite sheltered from the worst of the wind so nice to know it will take a bit of a hammering as long as its well pinned down.

                    i will get some pictures up once i get it all up and let you know how it is to put together.
                    Last edited by woody21; 15-04-2012, 12:28 AM.

                    Comment


                    • #11
                      If you have got an upgraded version for around 100 I'd very much like to see some inside and outside pictures either on here or by E-Mail

                      Regards Mas
                      '3000 volts says the ducks
                      are mine foxey !'

                      Comment


                      • #12
                        Originally posted by ukmastiff View Post
                        If you have got an upgraded version for around 100 I'd very much like to see some inside and outside pictures either on here or by E-Mail

                        Regards Mas
                        i will put plenty of pictures up as i assemble it, hopefully it will be up by next weekend at the latest, its driving me nuts having it sat in the shed.

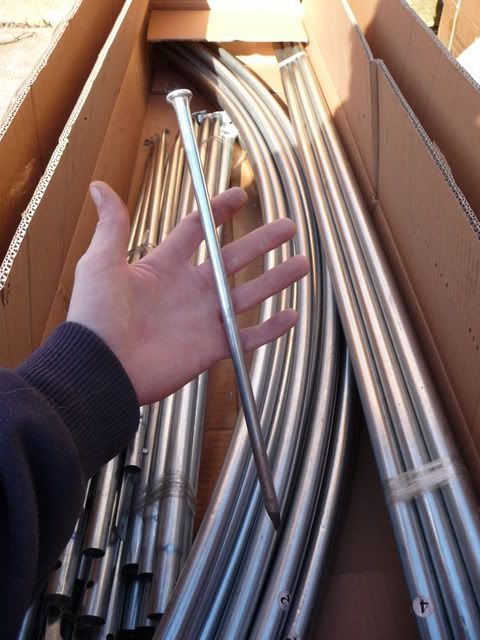
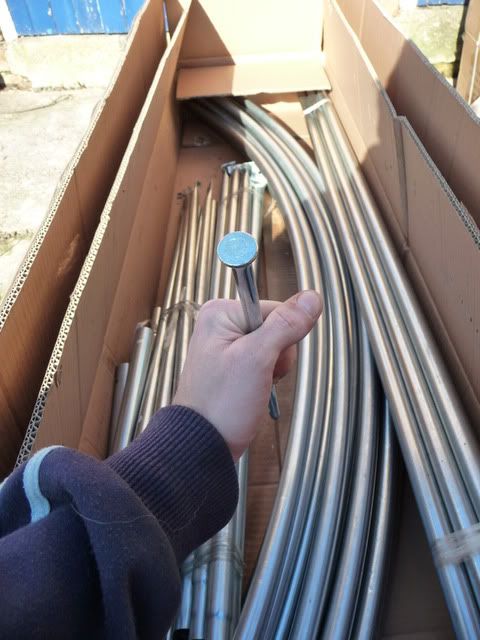
                        the newer galvanised frame model is a bit different to the white coated version as it has added ground bars and it also comes with galvanised stakes to peg the frame down.

                        Comment


                        • #13
                          Woody Ive sent you a P.M if yoiu could bare it in mind.

                          Ta

                          Mas
                          '3000 volts says the ducks
                          are mine foxey !'

                          Comment


                          • #14
                            heres a few pictures of it all still in the box, and the diagram of the frame and how its assembled.

                            Mas - does this new frame have more supporting/bracing bars than the older model?


                            Comment


                            • #15

                              Comment

                              Latest Topics

                              Collapse

                              Recent Blog Posts

                              Collapse
                              Working...
                              X